Fat Quarterly Issue 7 is out now! All about colour palettes and where to find help in choosing colours for your projects.


Screenprinting with Drawing Fluid - Part 3


This was really a lot of fun. I am definitely hooked.

I started printing with the screen in contact with the fabric and this seemed to work well for me. I am sure though that these results will differ with different inks and fabrics.

I started printing with yellow ink and added red later without washing out the screen. A few of my prints are a mixture of yellow, red and orange and I really like the effect. This is something I want to have a play around with later.

In general the prints came out well. Some were patchy in places due to uneven pressure with the squeegee or too little ink. A couple of the shapes were not totally intact. They obviously still had traces of screen filler.


The yellow ink was much more forgiving than the red ink! It was a slightly thinner consistency and made the berry shapes look more rounded.


A disadvantage of using drawing fluid is that it is hard to get crisp edges. But I have to say that I like the resulting prints. I am planning to make these into the backing of a quilt for our bed. I like the unevenness of the prints as I think they will add character to the backing fabric. In any case they will be a fond reminder for me of my first printing effort!

All in all a lot of fun and luckily for me Hanna slept through the whole thing. Including washing up the screen afterwards. I was afraid that she might wake up mid print which would have been a disaster as you have to work quickly.

Now I can't wait to have another go!

Great sites to check out:


On my desk Wednesday


My printing board, some screenprinting inks, some washed and ironed fabric, my squeegee, wet wipes, plastic knitfe and screen.

Here we go! Wish me luck! By the looks of it I need to redo the tape on my screen.

Screenprinting with drawing fluid - Part 2


Screen filler is supposed to be applied with one sweep of the squeegee across the screen. So I dribbled a bead of screen filler across the top of the screen and used my squeegee to pull it across the screen. I worked great - but I didn't believe that could possibly be enough and without thinking I pulled the squeege across the screen again and this time didn't apply even pressure, as you can see in the photo. Next time I am going to have to remind myself to stop after the first time. I think I was just so excited to use the squeegee that I couldn't stop myself having a second swipe at it!

Nevermind. I left the screen to dry overnight and washed it out in the morning. This is when I really regretted that second swipe of the squeegee. The areas that were lightly covered with screen filler washed out quickly, cleanly and easily. The areas where the screen filler was more thickly applied took a lot more effort. I really had to blast the screen from both sides with cold water from the shower head. I also took a cotton bud and had a little rub in some areas. Even after that there are still little specks of filler in some places.

The blast with the shower head also loosened some screen filler in the areas where I wanted screen filler. So I took my paintbrush and reapplied screen filler to those areas.

Now I am waiting for it to dry again before printing.


Celestina Carmen - Detailed explanation of using drawing fluid and screen filler. Mon lapin - Step by step guide to using drawing fluid and screen filler. Lena Corwin - Printing by Hand: A Modern Guide to Printing with Handmade Stamps, Stencils, and Silk Screens

Screenprinting with Drawing Fluid - Part 1

Over the weekend I finally chose a pattern to try out screenprinting with.

Using a pencil I traced the design onto my screen.

Next I grabbed the smallest paintbrush I could find and started to fill the shapes with drawing fluid. I copied Mon Lapin and painted on the recessed side. This seemed to be the side shown in all my books.

I wasn't sure how thick to paint with the drawing fluid. Some of the shapes I filled in thickly and some thinly so I might be able to see a difference later!? Lena Corwin suggests that painting thinly will enable you to see paintstrokes later. I think my shapes are too small for that but I will soon find out! The areas with thicker drawing fluid took much longer to dry and are slightly raised off the screen.


It was a little monotonous filling in all the shapes. But it was also fairly therapeutic! Just like helping Amelie colour between the lines in her colouring book!

For more information check out these links:

Celestina Carmen - Detailed explanation of using drawing fluid and screen filler.
Mon lapin - Step by step guide to using drawing fluid and screen filler.
Lena Corwin - Printing by Hand: A Modern Guide to Printing with Handmade Stamps, Stencils, and Silk Screens

Drop Pattern

I have become increasingly interested in textile design. Since I don’t come from a design background at all I have been doing a little bit of research on the internet into design basics. I thought I might share my findings with any of you like me who don’t already know all this stuff.
Please anybody who has anything to add or any resource to recommend – let me know! Thanks.

The Drop Pattern

Pure drop patterns do not change the size or shape of the original motif.

The simplest of the drop patterns is the Full Drop. In this pattern motives are repeated along the horizontal and vertical axes.


A famous example of this pattern:


(Have a go at changing the colours yourself here.)

Half Drop Repeat

The repeat of the motif is staggered by 50% by row or by column.


Column 50% offset.


Row 50% offset.

Other Drop Patterns

Can offset the rows and columns by whatever percentage you would like.

Problems with Drop patterns

Designer does not draw enough of the pattern in the design phase and so does not notice other patterns that appear within the drop pattern. i.e. patterns formed by white space in the motif (alleyways).

You have to be careful useing small offsets as it takes more repeats to return to the original position of the motif.

Things to try

Instead of designing within a square, design within a diamond. Often by changing the shape of the pattern repeat, you fill it differently.

Sources
Pattern Design - A Book for Students Treating in a Practical Way - Lewis F Day
Ariadne Textile Design Glossary
Textile Design Development - Pattern Repeats

Printing Surface

I am gearing up to do some screen printing. But since I am feeling a little under the weather I didn't want to plunge in and start. Instead I have prepared a printing board. All my books recommend printing on a slightly soft surface. So I bought a piece of wood and raided my supplies and copied Tina's great printing board. Thank you very much for posting how you made your board, Tina. Luckily for me my board was thick enough to take staples, which made this an extremely quick project.
I first stretched some batting over the board and stapled it down.
At the weekend I found some great canvas fabric which I stretched over the batting and stapled in place. Now I am off to wash and iron some fabric to print on.

On my Desk


A pile of circle quilts ready to be quilted, my sewing machine and my walker foot.

Flurry of birthdays

October is a packed month. My Mum, sister, husband and daughter all have their birthdays in October. If that isn't bad enough almost all of Hanna's little friends were also born in October. These are some of the t-shirts that I have printed over the last week. They are fairly quick and easy to do and I think make a special first birthday present.


Water test


Yesterday I gave the umbrella a good soaking. I used the shower head to pound it with both cold and warm water. I then left it to sit in some water for a while before letting it dry out.


All the prints weathered the treatment well. Both the stazon solvent ink and the acrylic / enamel ink print were just as vibrant after the water test as before. However, the fabric paint print was ever so slightly faded. I am sure this is because it was not heat set properly.


So I am clear in my recommendation - acrylic or enamel ink! Both maintained vibrancy and were easy to use. Just use sparingly. So I am off to buy some more in different colours to finish off this umbrella for Amelie.

Stamping the Umbrella

Lucky for Amelie it has been sunny the last couple of days so she hasn't minded Mummy tinkering about with her umbrella. I tested the ladybird stamp with fabric paint, stazon solvent pad, acrylic ink and enamel ink.


First up was fabric paint.


The print came out quite faint. I obviously need to apply more to the stamp. It dried very quickly with no bleeding. I used a hair dryer to heat set it. I blasted the umbrella for more than 5 minutes. Not sure it ever got hot enough. But we will see!


Next I tried staz on solvent ink. This is not meant for fabric. Rather for non-porous surfaces. But it is supposed to be weatherproof and I had some to hand so I thought might as well give it a go.


Not such a great photo but the results were not great either. It bled horribly. The design looked as if it had been drawn on with a felt tip. Not pretty.


Finally I tried acrylic and enamel ink on the same stamp. The red ink is acrylic and the black spots are enamel. For cost considerations I did not want to buy red and black in both acrylic and enamel. For some reason my local shop only seemed to stock huge quantities of the inks!


The results were great! However, I put too much ink on the stamp. Much less is needed than for fabric paint. The print is much more vibrant than either of the other prints and seemed to be equally as good for both the acrylic and enamel inks.


So now I am off to give the umbrella a shower. I'll let you know how it turns out.

On My Desk Wednesday


There's nothing crafty today on my desk, aka the dining room table. Instead there is a birthday cake and a couple of bottles of something for the adults. Today Hanna is 1. I can't believe how fast time flies with your second child. With Amelie I knew to almost the second how old she was, what the next developmental step was and so on. With Hanna this first birthday has just crept up on me! Although I can't remember life without her.

Happy birthday Hanna - I hope you have a wonderful day.

Sooziebee

A little while ago I was very lucky to win a giveaway at Sooziebee. Just look at all the goodies she sent me. Wow - I am bowled over. Thank you so much Sue. They are all absolutely gorgeous.


Sue is having a short blog break at the moment but I am looking forward to her returning. She is extemely inspirational. Check out her blog here and her etsy shop here.

How to carve a stamp

Over the weekend I carved a stamp ready to test umbrella stamping. Carving your own stamp is dead easy. For anyone who hasn't given it a go I highly recommend it. Once you start it is very addictive. Here's a step by step guide for anyone who hasn't tried this yet.
  • Sketch the design you want to make into a stamp.

  • Trace your design using carbon pencil.

  • Turn the traced picture face down on a block of rubber and rub hard all over the design


  • When you lift the tracing paper your design will be transferred to the rubber.

  • Cut your design from the piece of rubber. Cut close to the design to limit the amount of rubber that needs to be removed. However, cutting too close to the design may make your finished stamp fragile. For example, I did not cut between the ladybird's antennae. If I had done so I would have the risk that the antennae may break off the finished stamp.

  • Remove all the white parts of the design (or the black parts). I use a knife to cut around the edges and for small areas. Cut at a 45 degree angle. Don't cut straight down. Make sure that you do not undercut the design (in other words more than 90 degree angle). Cutting at 90 degrees or more significantly weakens the stamp. I use the lino cutter for clearing larger areas. You do not need to cut very deep to get good results.

  • When you are happy with your stamp make a test print. First give it a good blow to make sure all little pieces of rubber are removed. To make sure give it a rinse in water - but leave to dry thoroughly before using. But if you are impatient like me, grab a piece of scrap paper, ink the stamp and give it a go. Depending on your test print, either continue carving or move on to your real project. Afterwards give the stamp a clean with a babywipe.

Blade Runner Stamps sell rubber blocks and ship to Europe. Otherwise keep an eye out for cheap erasers. Often they are large enough for your needs. Recently I have found packs of 4 rectangular erasers in toys r us, woolworths and lidl.

More t-shirt printing

These t-shirt transfer sheets are wonderful. One of Amelie's favourite t-shirts (a plain pink t-shirt which she always chooses to wear) had a horrible grey mark on the front. Goodness knows where she got that from.


So I printed out her name using patterns from Petit Pattern Kids and Toys.


And voila - a more respectable looking t-shirt!


I also finally got around to washing some t-shirts with this stuff on and it comes out great! So my family had better watch out - I will be using this stuff on every piece of clothing I come across. Who needs to do laundry when I can just hide the stains!


On my Desk Wednesday


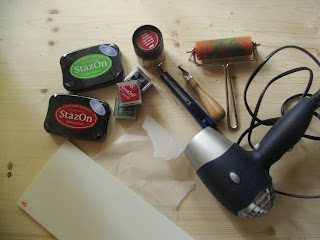
Not quite on my desk - but near to it. My supplies for testing stamping on umbrellas.
  • staz on stamp pads
  • acrylic ink
  • enamel ink
  • fabric paint
  • rubber block for making a stamp
  • tracing paper to trace the design
  • brayer
  • knife and lino cutter
  • hair dryer

Other players

Blockleim

After reading this post by Small Object I have been obsessed with finding padding compound here in Germany. It has taken me a while to work out exactly what it is in German but I found some here. I ordered some last week and it arrived on Friday.


I was itching to test it out so I printed out some very plain lists and photocopied them. These lists will hopefully help me keep my thoughts together. Since having children I seem incapable of keeping a thought in my head for more than two minutes. Or at least a thought that does not involve nappies, nap times, who's eaten what and so on....


It is a bit more difficult than I thought to get the paper to line up neatly. It will take a bit of practice I think. The glue dries clear but I would have preferred to have had a coloured glue. That might have hidden any imperfections. I think for pads that I don't want to tear the pages off I might glue a piece of coloured paper over the top to make it a bit more pretty!

But the pads I have made are proving to be extremely useful. I love this stuff. I have enough to make pads for the rest of my lifetime and then some. I am thinking Christmas presents, birthday presents for the rest of eternity!